Hi,
This tutorial will cover a step-by-step guide on configuring Amazon SES email with XenForo forum software and will guide you through setting it up with Cloudflare.
No complete guide is available on the internet for setting up XenForo with AWS SES. It was challenging to figure out as a beginner, and it took two days, but I am posting this guide to save your time. 👍
Basic requirements for setting up AmazonSES with XenForo and Cloudflare(optional)
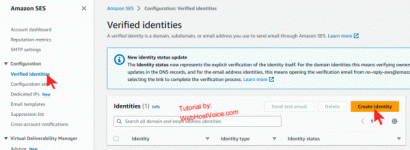
1. Go to Amazon SES Dashboard >> Configuration >> Verified identities >> Create identity.
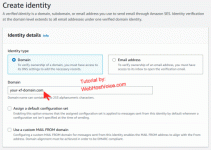
2. Choose the identity type as a domain. Enter your domain name, such as your XF forum domain name, in the domain field. I recommend selecting the domain verification method, as I have not tried the other way.
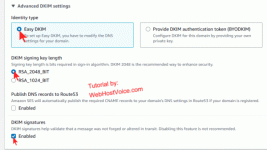
3. Scroll down to Advanced DKIM settings. See the below screenshot. Make changes and then click "Create identity".
4. Scroll down to the Publish DNS records. Create mentioned CNAME records on your domain.
For cPanel/DirectAdmin or Plesk users, you can create CNAME records from DNS/Zone Editor menu.
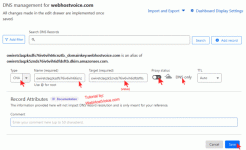
If your domain is behind Cloudflare, you can create records from DNS >> Records. It should be DNS only, so turn off "Proxied" for your CNAME records.
Screenshot on how to create CNAME records of Amazon SES with Cloudflare to verify your domain
This screenshot is just for your help. You have to make all three CNAME records one by one.
Go to Amazon Simple Email Service dashboard > Configuration > Verified identities to check the status. It should show the identity status as verified.

1. Log in to Amazon SNS Console.
2. Click on Topics.
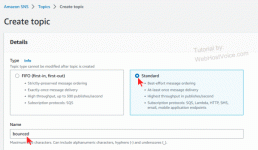
3. Click Create topic.
4. Choose topic type: Standard, enter a name such as bounced.
5. Leave all other options as it is, scroll down and click Create topic.
6. Repeat the above steps to create a topic for the unsubscribe option.
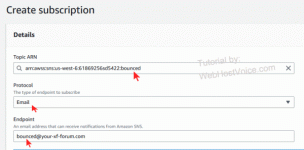
2. Now, under the bounced topic, click Create subscription.
3. Topic ARN: Choose the newly created topic "bounced".
4. Choose Protocol: Email
5. Endpoint: Enter your bounce email.
6. Leave all other options as it is. Click Create subscription.
7. Repeat steps 1 to 6 to create a subscription for the unsubscribe option.
2. Click on the domain identity used to send emails from your XenForo forum.
3. Click on Notifications. Under the "Feedback notifications", click edit.
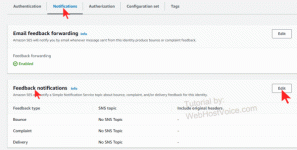
4. Bounce feedback: Choose bounce SNS. For "complaints feedback", choose "unsubscribe" SNS.
5. Checkmark, Include original email headers and then save.
You can create a new SNS topic for complaint feedback and forward it to your monitoring email for manual action. But I prefer to use the automated unsubscribe handler of XenForo.
2. Click on the domain identity used to send emails from your XenForo forum.
3. Under Legacy TXT records, click download Legacy TXT record set.
4. Open the downloaded file, and create TXT records with mentioned name and values. Cloudflare users can create records in DNS > Records area. cPanle users can create TXT DNS records from the Zone editor.
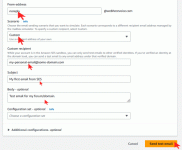
From the AWS SES Dashboard >> Configuration >> Verified identities. Select the identity (your domain) and click Send test email. You can also click on your domain and find the send test email option on the right.

Here is my test email form. Ensure the custom recipient is your email where you will receive your test email.
Step 8: How to Create SMTP credentials in SES:
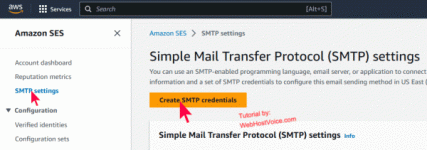
1. Go to Amazon Simple Email Service (SES) in your AWS Console > SMTP Settings > Create SMTP credentials.
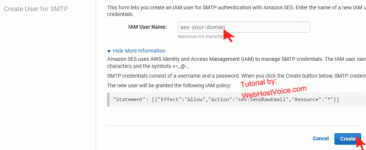
2. Enter "IAM User Name" and click Create. You can enter your forum name or anything else.
3. Click Download Credentials or "Show User SMTP Security Credentials" and copy it into a notepad. In the next step, we will copy the SMTP endpoint.
4. Go to Amazon SES Dashboard >> SMTP Settings and copy the SMTP endpoint URL. Copy TLS Wrapper port. I hope that you are copying this all in one place. In the next step, we will need these.
We have successfully set up the part of Amazon SES.
We will use [email protected](Whicher domain is verified in AWS SES), so the default email address should be: [email protected]

1. From the Email transport method option, choose the connection type to SMTP.
2. Enter the following details we copied in the 3rd and 4th points of the above step (How to Create SMTP credentials in SES).
Hostname: Your Amazon SES SMTP endpoint.
Port: 465
Authentication: Choose a username and password, then enter your Amazon SES SMTP username and password.
Encryption: SSL
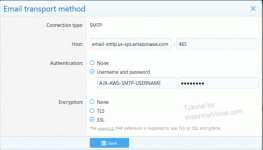
3. Click save.
You have three options for bouncing and unsubscribing emails:
1st. If you are not using Proxy DNS/Cloudflare, you can create a new subdomain, such as forummail.your-xf-domain.com and create your bounce and unsubscribe email.
2nd. Buy a new domain and host it on your server or probably in the same place where your forum is hosted. I think your hosting company can allow you to add one more domain.
3rd. Buy a domain and host it with any affordable mail hosting company that charges about $10 ~ $20 per year for two or more email addresses.
4th. This option is not recommended. You can keep bounce/unsubscribe disabled, but Amazon SES can penalize you and even ban your account for not handling bounce and unsubscribed emails.
I considered buying a new domain but ended up using my existing domain.
While creating an email account in cPanel, choose Automatically Create Folders for Plus Addressing.
For bounce/unsubscribe, I use one of my existing domains. My bounce email is bounce@your-private-domain dot com, and I also created an email for unsubscribing using the same above method.
I am a Cloudflare user. Should I worry about my mail server privacy?
As I know, XF will only use bounce/unsubscribe internally and does not use bounce/unsubscribe email addresses to send emails to your forum users. Hence, your server IP will not be exposed to the public.
2. Enter the unsubscribe address in the "Unsubscribe email address" field.
Scroll down to the Automated bounced email handler. Choose the IMAP option and enter your IMAP credentials.
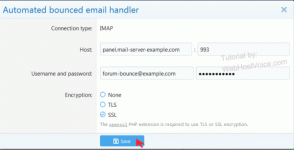
Now we will do similar steps for the Automated unsubscribe email handler. Note that the email address of the unsubscribe should be different than the bounce email. Click save.
Scroll down to the end of the page and again click on save.
Login to your bounce email inbox and check if XenForo sends any notice of bounce. If you receive a bounce email, then follow the next step.
1. Under the XenForo Admin go to Tools > Cron enteries. Find Process email bounces. In right side click on Run now icon. See the below screenshot.

2. I changed a forum user's email address to mine for testing unsubscribe email handling. Then I sent a message from the admin account. I checked my private email address and clicked on unsubscribe.
3. From Xenforo Admin > Tools > Cron enteries. Look for Process email unsubscribe requests and click on the Run now icon.
4. Finally, log in to the email inbox of bounce and unsubscribe. If XenForo successfully processed it, then there should be no email messages exist. You can find errors and debugs related messages to bounce/unsubscribe from XF > Logs > Errors > Server error log.
Congratulations, you have successfully set up Amazon SES email with XenForo and set up email handling. I hope this article is helpful for you and it saves your time.
If you have any queries, then you can ask them in this forum.
This tutorial will cover a step-by-step guide on configuring Amazon SES email with XenForo forum software and will guide you through setting it up with Cloudflare.
No complete guide is available on the internet for setting up XenForo with AWS SES. It was challenging to figure out as a beginner, and it took two days, but I am posting this guide to save your time. 👍
Basic requirements for setting up AmazonSES with XenForo and Cloudflare(optional)
- AmazonSES Account.
- You need a separate email address for Unsubscribe and Bounce. I mentioned it in this guide.
- The default sending email address should be no-reply at your_xf_domain.com.
How to Configure Amazon SES with XenForo forum?
I hope that your Amazon SES account is not in sandbox mode. Please follow the below steps.Step 1: How to verify domain in Amazon SES or Create identities in Amazon SES?
You have to verify your domain or email address. I choose to verify my domain name. You can use any one method you like.1. Go to Amazon SES Dashboard >> Configuration >> Verified identities >> Create identity.

2. Choose the identity type as a domain. Enter your domain name, such as your XF forum domain name, in the domain field. I recommend selecting the domain verification method, as I have not tried the other way.

3. Scroll down to Advanced DKIM settings. See the below screenshot. Make changes and then click "Create identity".

4. Scroll down to the Publish DNS records. Create mentioned CNAME records on your domain.
For cPanel/DirectAdmin or Plesk users, you can create CNAME records from DNS/Zone Editor menu.
If your domain is behind Cloudflare, you can create records from DNS >> Records. It should be DNS only, so turn off "Proxied" for your CNAME records.
Screenshot on how to create CNAME records of Amazon SES with Cloudflare to verify your domain
This screenshot is just for your help. You have to make all three CNAME records one by one.

Step 2: How to check the domain is verified in Amazon SES?
Before sending a test email from AmazonSES, make sure that your domain is verified. After you add CNAME records, updating with Amazon SES can take some time.Go to Amazon Simple Email Service dashboard > Configuration > Verified identities to check the status. It should show the identity status as verified.

Step 3: Create SNS topics in Amazon SNS.
Amazon SNS means Simple Notification Service.1. Log in to Amazon SNS Console.
2. Click on Topics.
3. Click Create topic.
4. Choose topic type: Standard, enter a name such as bounced.
5. Leave all other options as it is, scroll down and click Create topic.
6. Repeat the above steps to create a topic for the unsubscribe option.

Step 4: Subscribe to Amazon SNS
1. Click on the newly created bounced topic from the Topics menu.2. Now, under the bounced topic, click Create subscription.
3. Topic ARN: Choose the newly created topic "bounced".
4. Choose Protocol: Email
5. Endpoint: Enter your bounce email.
6. Leave all other options as it is. Click Create subscription.
7. Repeat steps 1 to 6 to create a subscription for the unsubscribe option.

Step 5: Assign SNS topics to your Amazon SES domain
1. Go to Amazon SES Dashboard >> Configuration >> Verified identities.2. Click on the domain identity used to send emails from your XenForo forum.
3. Click on Notifications. Under the "Feedback notifications", click edit.

4. Bounce feedback: Choose bounce SNS. For "complaints feedback", choose "unsubscribe" SNS.
5. Checkmark, Include original email headers and then save.
You can create a new SNS topic for complaint feedback and forward it to your monitoring email for manual action. But I prefer to use the automated unsubscribe handler of XenForo.
Step 6: Publishing an MX record for Amazon SES email receiving on XenForo
1. Go to Amazon SES Dashboard >> Configuration >> Verified identities.2. Click on the domain identity used to send emails from your XenForo forum.
3. Under Legacy TXT records, click download Legacy TXT record set.
4. Open the downloaded file, and create TXT records with mentioned name and values. Cloudflare users can create records in DNS > Records area. cPanle users can create TXT DNS records from the Zone editor.
Step 7: How to send a test email using Amazon SES?
We will send a test email to ensure that the email is working.From the AWS SES Dashboard >> Configuration >> Verified identities. Select the identity (your domain) and click Send test email. You can also click on your domain and find the send test email option on the right.

Here is my test email form. Ensure the custom recipient is your email where you will receive your test email.

Step 8: How to Create SMTP credentials in SES:
1. Go to Amazon Simple Email Service (SES) in your AWS Console > SMTP Settings > Create SMTP credentials.

2. Enter "IAM User Name" and click Create. You can enter your forum name or anything else.

3. Click Download Credentials or "Show User SMTP Security Credentials" and copy it into a notepad. In the next step, we will copy the SMTP endpoint.
4. Go to Amazon SES Dashboard >> SMTP Settings and copy the SMTP endpoint URL. Copy TLS Wrapper port. I hope that you are copying this all in one place. In the next step, we will need these.
We have successfully set up the part of Amazon SES.
Step 9: Configure Amazon SES email with XenForo
Login to the XenForo Admin dashboard > Setup > Options > Email options.We will use [email protected](Whicher domain is verified in AWS SES), so the default email address should be: [email protected]

1. From the Email transport method option, choose the connection type to SMTP.
2. Enter the following details we copied in the 3rd and 4th points of the above step (How to Create SMTP credentials in SES).
Hostname: Your Amazon SES SMTP endpoint.
Port: 465
Authentication: Choose a username and password, then enter your Amazon SES SMTP username and password.
Encryption: SSL

3. Click save.
Step 10: How to Setup Xenforo Bounce Email?
You need to understand that Amazon SES is only for sending emails. Receiving emails with SES is a bit complicated to set up. To receive emails, you must set up a separate email address for bounce and unsubscribe.You have three options for bouncing and unsubscribing emails:
1st. If you are not using Proxy DNS/Cloudflare, you can create a new subdomain, such as forummail.your-xf-domain.com and create your bounce and unsubscribe email.
2nd. Buy a new domain and host it on your server or probably in the same place where your forum is hosted. I think your hosting company can allow you to add one more domain.
3rd. Buy a domain and host it with any affordable mail hosting company that charges about $10 ~ $20 per year for two or more email addresses.
4th. This option is not recommended. You can keep bounce/unsubscribe disabled, but Amazon SES can penalize you and even ban your account for not handling bounce and unsubscribed emails.
I considered buying a new domain but ended up using my existing domain.
Step 11: How do I create Bounce/Unsubscribe Emails for XenForo with cPanel?
Creating an email for the bounce differs from creating an email address in cPanel.While creating an email account in cPanel, choose Automatically Create Folders for Plus Addressing.
For bounce/unsubscribe, I use one of my existing domains. My bounce email is bounce@your-private-domain dot com, and I also created an email for unsubscribing using the same above method.
I want to use my forum domain name for handling unsubscribe and bounce email in XenForo
I am using Cloudflare, so I use free Cloudflare Email routing. It sends your emails to your custom domain. So bounce@your-private-domain will be forwarded to bounce@your-xf-forum. Non-Cloudflare users can use their forum domain name for handling bounce emails.I am a Cloudflare user. Should I worry about my mail server privacy?
As I know, XF will only use bounce/unsubscribe internally and does not use bounce/unsubscribe email addresses to send emails to your forum users. Hence, your server IP will not be exposed to the public.
Step 12: Configure Bounce / Unsubscribe email handling in XenForo
1. From the XF admin section, go to Setup> Options > Email options. In the Bounced email address, add your bounce email address.2. Enter the unsubscribe address in the "Unsubscribe email address" field.
Scroll down to the Automated bounced email handler. Choose the IMAP option and enter your IMAP credentials.

Now we will do similar steps for the Automated unsubscribe email handler. Note that the email address of the unsubscribe should be different than the bounce email. Click save.
Scroll down to the end of the page and again click on save.
Final Step: How can I test whether bounce and unsubscribe email handlers are working in XenForo?
Before testing it:- Create a new forum user or use the existing one.
- Edit the email of one of your forum users to a dead email, such as setting the email address to the non-existing domain.
- Send a message from your forum admin account to a user with a dead email.
1. Under the XenForo Admin go to Tools > Cron enteries. Find Process email bounces. In right side click on Run now icon. See the below screenshot.

2. I changed a forum user's email address to mine for testing unsubscribe email handling. Then I sent a message from the admin account. I checked my private email address and clicked on unsubscribe.
3. From Xenforo Admin > Tools > Cron enteries. Look for Process email unsubscribe requests and click on the Run now icon.
4. Finally, log in to the email inbox of bounce and unsubscribe. If XenForo successfully processed it, then there should be no email messages exist. You can find errors and debugs related messages to bounce/unsubscribe from XF > Logs > Errors > Server error log.
Congratulations, you have successfully set up Amazon SES email with XenForo and set up email handling. I hope this article is helpful for you and it saves your time.
If you have any queries, then you can ask them in this forum.


